Create A Customizable Model Schooner with Laser Cut Parts

Primary tabs

Skill Level: 
Intermediate
Project Hours: 
6.0 hours
Project Required Badges: 

Materials Needed:

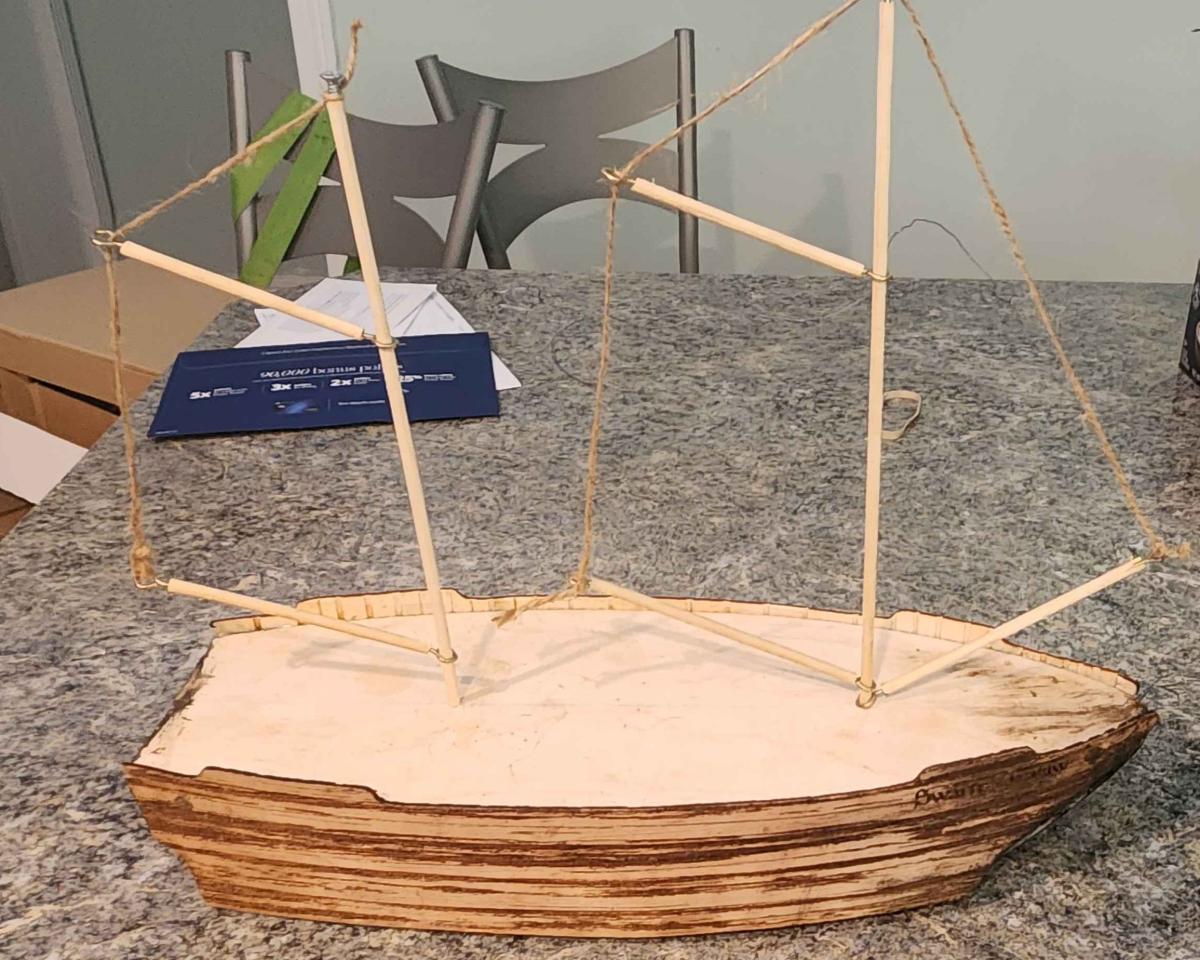
12”x24” sheet of 1/8th” thick laserable plywood, available in the Materials Store
4 to 5 10” long dowels, about 3/16” diameter
Attached .svg files for deck and hull shapes
24”x24”x2” thick extruded foam insulation board/project panel (not styrofoam/”beadboard”; too fragile)
Spare scrap wood/posterboard/cardstock, about a 12”x12” sheet’s worth
Roll of twine, length varies (see below)
12x threaded metal eyelets less than 3/16” in thread diameter, with openings just slightly over 3/16” in diameter
Zip ties or stiff rubber bands (former recommended over latter due to reliability and rigidity)
Super glue or wood glue (Gorilla Glue recommended for ease of use and low cost)
Wood stain (Optional)

Tools:

Laser cutter (Badge required)
Utility knife or other blade capable of cutting foam insulation board (MakeHaven’s foam cutter can also be used if you have the requisite badge.)
Wood saw and miter box (A table saw can also be used if you have the requisite badge)
Pin vise or hand drill and 3/16” drill bit (former recommended over latter for usage on dowels due to the fragility of the wood used)
Gloves and eye protection

Instructions: 
Step Title: 
General Setup and Preparation
Step Text: 

1: Download the .svg file for deck and hull panels/texture from [https://drive.google.com/file/d/1QMUaT8wPcgCtz7JGx28Rpys8UMVI_CzU/view?u...
Ensure that scaling is correct; each hull panel should be about 15” long from front to back to fit the intended scale. Optionally, you can adjust it to be larger or smaller proportionately to suit your own needs.
(Note: This is the time to make any modifications you’d like to the outer hull and deck, such as adding an engraved name for the model ship, adjusting the texturing on the hull panels, or adding an engraved grid to the top side of the deck for tabletop game use. I opted to let the grain of the wood form the “texturing” for the deck; more enterprising makers might wish to texture it to replicate scaled-down deck planking, or even to add guide points for the masts to be drilled through later on. However, be aware that the more detail you add, the longer the next step will take.)

Laser Cutting the Hull and Deck

Load the sheet of laserable plywood into the laser cutter and run the file once you’ve ensured that everything is rendered correctly in Inkscape, the laser is focused properly, and your origin is set to allow the whole image to fit on one board. Retrieve the cut pieces afterward.
(Note: I made the mistake of setting the origin too far into the sheet when I first ran the prototype version of this project, forcing me to use a separate scrap piece of plywood for the remainder, resulting in a mismatched finish in the wood.)

Step Title: 
Kerf Cutting the Hull Panels
Step Text: 

Mark vertical lines from one long edge to the other along the untextured faces of each side panel, about 1 to 1 ½ inches apart, using a pencil or permanent marker, before inserting the hull panel with those lines face-up into a miter box. Use a wood saw to cut along each line about halfway through the overall thickness of the wood without cutting all the way through; if done properly, this will allow the sides of the ship to bend and flex in order to fit the contours of the deck panel. Repeat for the remaining panel.
(Note: It may take several passes, as well as additional interspersed cuts, to enable the wood to flex sufficiently to match the curves of the deck, especially if you’re using a stiffer piece of wood for the hull. Experiment with the placement of additional cuts if you feel comfortable doing so.)

Step Title: 
Cutting the Foam Interior
Step Text: 

Trace the outline of the deck panel onto the foam board twice, so that you have two copies of it drawn onto the foam’s surface. Using a utility knife, razor saw, or other method capable of producing cuts along curved paths such as MakeHaven's hot-wire foam cutter (if you have the appropriate badge), cut out each traced piece. Afterward, glue them on top of each other using superglue such as Gorilla Glue, using clamps or weights to maintain pressure until the glue cures. When that's finished curing, glue the wooden deck panel on top using the same technique.
(Note: Be sure to test your chosen superglue on a spare piece of foam to ensure its composition won’t dissolve the foam completely! I discovered that possibility when attempting to glue extra foam pieces together for what was thankfully a separate personal project.)

Gluing it All Together

Using whatever means necessary–ratchet straps, zip ties, flexible clamps, or stiff rubber bands–bend one hull panel to the contours of the deck and superglue it to the foam, with the top edge protruding slightly above the top face of the deck panel. Repeat for the remaining hull panel once it’s cured and you’re certain it will hold its shape.
(Note: Be patient with this part; given the choice between waiting too long or too little, choose let it cure too long if necessary. It may take several extended gluing and drying sessions to complete the bending and fitting process. Also, be careful not to overtighten the fit to the point that the wood cracks or splinters under the strain!)

Step Title: 
Cleaning up the Foam Contours
Step Text: 

6: Using a knife, and with the wood as a guide, cut off the exposed pieces of foam where it extends past the edges of the side panels, forming smooth, sloped surfaces that match the curvature of the front and back of the ship.
(Note: This may leave you with a protruding platform at the stern of the ship formed by the overhanging portion of the deck; feel free to cut that off as well. You can use scrap wood, cardboard, or even posterboard to cover the remaining exposed sections of foam visible from a direct head-on or rear point of view afterward, though using wood may require similar “kerf cutting” techniques to those used to allow the side panels to bend earlier.)

Step Title: 
Seating the Masts
Step Text: 

Using a pin vise or hand drill, make a pair of 3/16” diameter holes along the centerline of the top panel, drilling partway into the foam if needed. The holes should be positioned at roughly ¼ and ¾ the overall length of the ship. Insert a 10” long, 3/16” diameter dowel partway into each hole, optionally gluing them in place if needed to keep them seated

Finishing and Rigging the Masts

Cut five approximately 3 ½” to 4” long sections using the remaining dowels to form the angled components of the masts. Carefully screw a threaded eyelet into each end, then push them onto the masts proper, one to just a few inches above the deck, the other about ¾ of the way up, adding an extra directly above the deck’s surface on the forward mast. Afterwards, screw one eyelet into the top of each mast. When that’s done, use the eyelet holes as guides for twine or cable, keeping the length of the twine just long enough to keep the angled portions taut and in position. Tie off the loose ends on each lower eyelet.
(Note: The dowels are fragile, be sure not to risk cracking the wood by screwing the eyelets in too far or with too much force!)

Finishing Touches

Optionally, add stain or other finishing touches and detail parts such as furled or open cloth sails, then your ship is done!

Project Advice: 

Who's Made It